
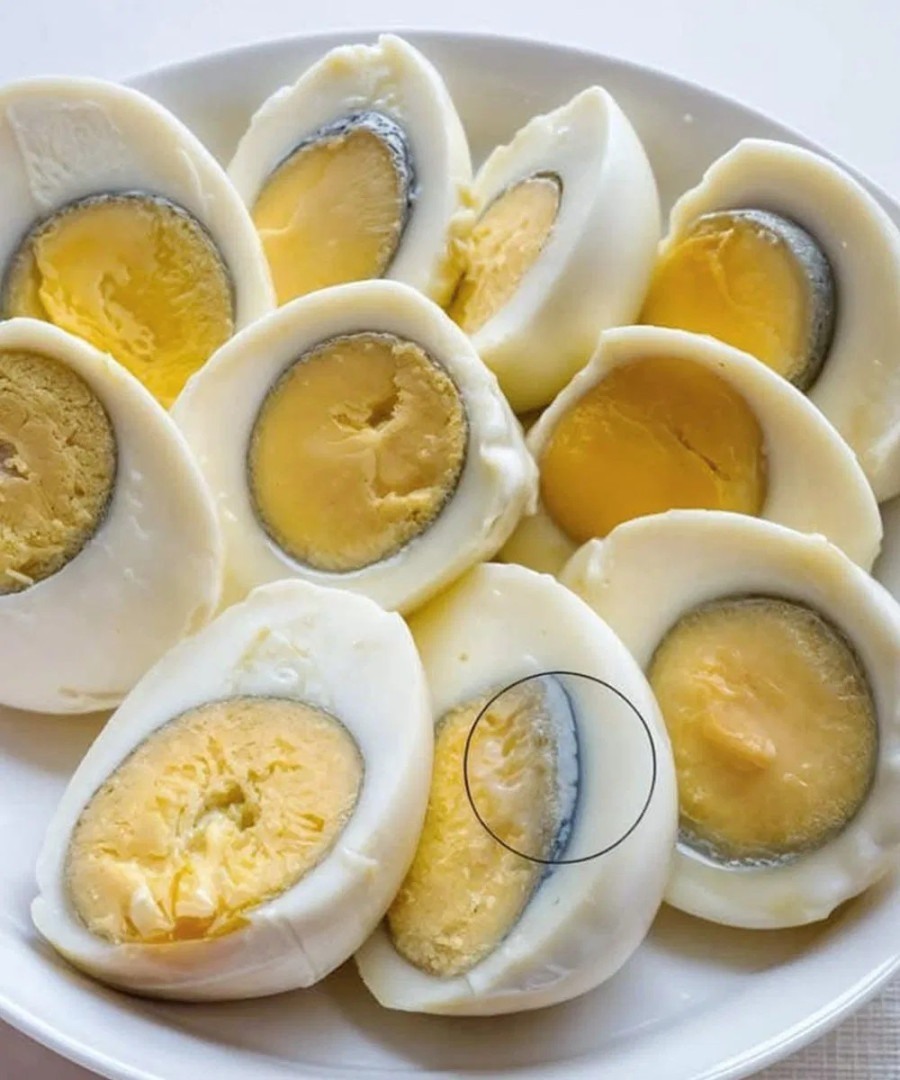
You’ve boiled your eggs, peeled them perfectly, sliced them in half for a beautiful deviled egg platter — and there it is. That uninvited greenish-gray ring surrounding the yolk, turning what should be a golden centerpiece into something that looks vaguely alarming.
If you’ve ever wondered whether it means the eggs went bad, whether you did something wrong, or whether it’s safe to eat — this is everything you need to know. The green ring is one of the most misunderstood kitchen phenomena, and once you understand what’s actually happening, you’ll never have to deal with it again.
Is the Green Ring Dangerous?
Let’s address this immediately: no. The greenish-gray ring that forms around a hard-boiled egg yolk is completely harmless. It is not mold, it is not bacteria, it is not a sign of spoilage, and it does not affect the taste, nutrition, or safety of the egg in any meaningful way.
It is purely a cosmetic issue — one that matters enormously when you’re making deviled eggs, sliced eggs for a salad, or any dish where presentation counts. But from a food safety perspective, an egg with a green ring is just as safe and nutritious as one without.
What Actually Causes the Green Ring?
The explanation is straightforward chemistry, and it happens in two steps.
Step one — the egg white releases hydrogen sulfide. Egg whites contain proteins rich in sulfur. When eggs are heated — particularly at high temperatures or for extended periods — these proteins break down and release hydrogen sulfide gas. This is the same compound responsible for the characteristic “rotten egg” smell you sometimes notice around hard-boiled eggs. The longer and hotter the cooking, the more hydrogen sulfide is produced.
Step two — the hydrogen sulfide meets iron in the yolk. The yolk is where virtually all of the egg’s iron is concentrated, bound to a protein called phosvitin. When heat loosens this bond, the freed iron becomes available to react. As the hydrogen sulfide gas migrates inward from the white toward the yolk during cooking, it encounters this freed iron at the yolk’s surface — and the two react to form ferrous sulfide.
Ferrous sulfide is the green-gray compound you see as the ring. It forms precisely at the boundary between the white and the yolk — which is why the discoloration appears as a ring at the yolk’s edge rather than throughout the yolk itself.
The more hydrogen sulfide produced (from overcooking), and the more iron released from the yolk proteins (also from heat), the thicker and more visible the ring becomes. An egg boiled for 20 minutes will have a dramatically more pronounced green ring than one cooked correctly for 12 minutes.
There is one additional contributing factor worth knowing: the iron content of your cooking water. In areas with naturally high iron levels in the tap water, the mineral-rich water can contribute additional iron to the reaction, making green rings more likely even when cooking time is appropriate. If you live in an area with hard, mineral-rich water and notice persistent green rings despite correct timing, using filtered water for boiling eggs can make a noticeable difference.
The Two Causes That Create the Problem
Every green ring comes down to one or both of these:
Overcooking. This is the primary cause in the overwhelming majority of cases. Cooking eggs beyond the optimal time — anything over 12 to 15 minutes at a boil — produces significantly more hydrogen sulfide and releases significantly more iron from the yolk proteins, dramatically increasing the intensity of the reaction. The difference between a 12-minute egg and a 20-minute egg is visually striking when you slice them open.
Slow cooling. This is the second most common cause and the one many people overlook. Even if you cooked your eggs for exactly the right amount of time, the chemical reaction doesn’t stop the moment you remove the pot from the heat. As long as the egg remains hot, the reaction continues — the hydrogen sulfide keeps migrating toward the yolk and the iron keeps reacting. An egg left sitting in hot water after cooking, or cooled slowly at room temperature, will develop a green ring even if the cooking time itself was perfect.
This is why the ice bath is not optional — it is the single most important step in preventing the green ring.
The Perfect Hard-Boiled Egg Method — No Green Ring, Every Time
Follow this method precisely and you will produce hard-boiled eggs with perfectly golden yolks every single time.
Step 1 — Start with cold water and cold eggs. Place your eggs in a single layer at the bottom of a saucepan. Add cold water until it covers the eggs by at least one full inch. Starting in cold rather than boiling water ensures the eggs heat gradually and evenly, reducing the risk of cracking and producing a more uniformly cooked result.
Step 2 — Bring to a gentle boil over medium heat. Place the pan over medium heat and bring the water slowly to a boil. Do not rush this with high heat — a rapid, rolling boil from the start pushes internal egg temperatures higher and faster than necessary, accelerating both the hydrogen sulfide production and the iron release that create the ring.
Step 3 — Remove from heat and cover immediately. The moment the water reaches a full boil, remove the pan from the burner and place a tight-fitting lid on it. This is the key step that separates perfectly cooked eggs from overcooked ones. The residual heat in the water continues cooking the eggs gently, without the aggressive high temperature of a sustained boil.
Step 4 — Time precisely. Leave the eggs in the covered hot water for exactly 12 minutes for large eggs, 9 to 10 minutes for medium eggs, and 14 to 15 minutes for extra-large eggs. Set a timer the moment you put the lid on and don’t guess.
Step 5 — Ice bath immediately — this step is non-negotiable. The moment the timer goes off, drain the hot water and transfer the eggs immediately into a bowl filled generously with cold water and ice. Do not run them briefly under the tap and call it done — the eggs need to be submerged in genuinely cold water with ice to stop the cooking process effectively. Leave them in the ice bath for a minimum of 5 minutes, ideally until completely cooled to the touch.
This rapid cooling does two critical things: it stops the chemical reaction in its tracks by dropping the egg’s internal temperature quickly, and it causes the egg white to contract slightly from the shell, making peeling dramatically easier.
Step 6 — Refrigerate in the shell until ready to use. If you’re not using the eggs immediately, store them unpeeled in the refrigerator. The shell provides a natural protective layer that keeps the egg fresher for longer.
Additional Tips for Consistently Perfect Results
Don’t boil eggs at a rolling boil for the entire cooking time. A sustained, vigorous boil throughout the cooking process is one of the most reliable ways to produce green-ringed, rubbery-textured eggs. The gentle, off-heat approach described above solves both problems simultaneously.
Use eggs that are a few days old rather than the very freshest. Very fresh eggs are notoriously difficult to peel cleanly — the membrane adheres tightly to the shell. Eggs that are 7 to 10 days old peel significantly more easily while still being perfectly fresh for eating. This has minimal impact on the green ring but makes your entire experience considerably less frustrating.
Never let eggs sit in the hot water after the timer goes off. Even an extra five minutes in hot water makes a visible difference to the yolk. Treat the timer as absolute — the moment it rings, those eggs go into the ice bath.
Use filtered or low-iron water if you’re in a high-mineral area. If you’ve followed correct timing and cooling religiously and still find consistent green rings, the iron content of your local tap water is likely contributing. Filtered water eliminates this variable entirely.
For the pressure cooker method: Electric pressure cookers have become popular for hard-boiled eggs because the shells peel more easily afterward. Cook on high pressure for 5 minutes, natural release for 5 minutes, then immediately into an ice bath. The same cooling rule applies.
Why Does the Ring Sometimes Appear Even After Short Cooking?
Occasionally, even careful cooks encounter a faint ring on a properly timed and quickly cooled egg. A few factors explain this:
Older eggs — as eggs age, the pH of the white rises, which slightly accelerates the release of hydrogen sulfide during cooking. This is a minor factor compared to cooking time and cooling, but it’s real.
Higher-altitude cooking — water boils at a lower temperature at altitude, meaning eggs take longer to reach the internal temperature needed to fully set the yolk, extending the overall cooking time and increasing the risk of the sulfur-iron reaction.
Starting from very cold eggs — eggs taken directly from a cold refrigerator take slightly longer to cook through than eggs at room temperature, which can mean the outer layers are exposed to heat for longer while the center catches up.
None of these factors override the fundamental rules of timing and rapid cooling — but they help explain occasional outliers when everything else seems right.
What to Do If You Already Have Green-Ringed Eggs
If you’ve made a batch and the green ring has already formed, the eggs are completely safe to eat. For dishes where appearance isn’t critical — egg salad, chopped egg toppings, egg sandwiches — they work perfectly. The flavor and nutrition are unaffected.
For presentations where the ring would be visible — deviled eggs, sliced eggs on a platter, Cobb or Niçoise salads — the most practical solution is to start a fresh batch using the method above. There is no way to reverse the ferrous sulfide once it has formed.
